Merhaba sevgili android geliştiricileri. Bu makalemde sizlere instagramda gördüğümüz menüden bahseceğim.
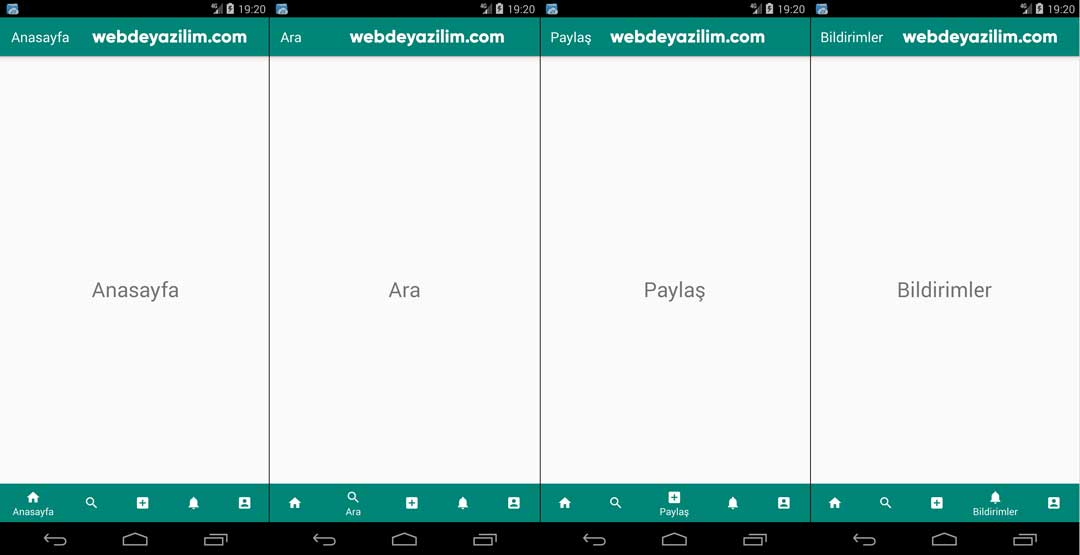
BottomNavigationView fragmentler aracılığıyla birden fazla(en fazla 5) ekranı sunan bir menü. Bu menü tabiki sadece instagramda yok twitter, bionluk, udemy, netflix, spotify gibi uygulamalarda bu menüyü kullanıyor.
BottomNavigationView Nasıl Kullanılır?
- Önce android projemizi oluşturalım.
- BottomNavigationView kütüphanesini ve diğer google kütüphanelerini <app>/build.gradle içerisine şu şekilde import edelim.
dependencies { implementation fileTree(dir: 'libs', include: ['*.jar']) implementation "org.jetbrains.kotlin:kotlin-stdlib-jdk7:$kotlin_version" implementation 'androidx.core:core-ktx:1.1.0' implementation 'androidx.appcompat:appcompat:1.1.0' implementation 'androidx.constraintlayout:constraintlayout:1.1.3' implementation 'androidx.coordinatorlayout:coordinatorlayout:1.1.0' implementation 'com.google.android.material:material:1.2.0-alpha02' } - Menümüzü tasarlarken aynı context menü kullanıyor gibi menü dosyası oluşturalım. res/navigation.xml.
<?xml version="1.0" encoding="utf-8"?> <menu xmlns:android="http://schemas.android.com/apk/res/android"> <item android:id="@+id/home" android:icon="@drawable/ic_home" android:title="@string/home" /> <item android:id="@+id/search" android:icon="@drawable/ic_search" android:title="@string/search" /> <item android:id="@+id/share" android:icon="@drawable/ic_share" android:title="@string/share" /> <item android:id="@+id/notifications" android:icon="@drawable/ic_notifications" android:title="@string/notifications" /> <item android:id="@+id/profile" android:icon="@drawable/ic_profile" android:title="@string/profile" /> </menu> - Şimdi MainActivity.kt için tasarım kısmını halledelim. activity_main.xml
<?xml version="1.0" encoding="utf-8"?> <com.google.android.material.circularreveal.coordinatorlayout.CircularRevealCoordinatorLayout xmlns:android="http://schemas.android.com/apk/res/android" xmlns:app="http://schemas.android.com/apk/res-auto" xmlns:tools="http://schemas.android.com/tools" android:layout_width="match_parent" android:layout_height="match_parent" tools:context=".MainActivity"> <FrameLayout android:id="@+id/container" android:layout_width="match_parent" android:layout_height="match_parent" app:layout_behavior="@string/appbar_scrolling_view_behavior" /> <com.google.android.material.bottomnavigation.BottomNavigationView android:id="@+id/navigation" android:layout_width="match_parent" android:layout_height="wrap_content" android:layout_gravity="bottom" android:background="?android:attr/windowBackground" app:itemBackground="@color/bgBottomNavigation" android:foreground="?attr/selectableItemBackground" app:itemIconTint="@android:color/white" app:itemTextColor="@android:color/white" app:menu="@menu/navigation" /> </com.google.android.material.circularreveal.coordinatorlayout.CircularRevealCoordinatorLayout> - Burada FramaLayout fragmentleri replace edeceğimiz view. Html ile iframe kullanmak gibi düşünebilirsiniz. Altında ise BottomNavigationView var. Menüyü tanımladıktan sonra kod kısmına geçelim.
- HomeFragment, SearchFragment, ShareFragment, NotificationFragment ve ProfileFragment adında 5 adet Fragment dosyası oluşturduk. Başlangıçta bir işlevi olmadığı için hepsi birbirinin aynısı 5 Fragment dosyası olarak düşünebilirsiniz. Örnek olarak HomeFragment.kt
class HomeFragment: Fragment(){ override fun onCreateView(inflater: LayoutInflater, container: ViewGroup?, savedInstanceState: Bundle?): View? { val view: View = inflater.inflate(R.layout.fragment_home, container, false) return view } } - Şimdi MainActivity.kt
class MainActivity : AppCompatActivity(), BottomNavigationView.OnNavigationItemSelectedListener { - Öncelikle OnNavigationItemSelectedListener’ı ekliyoruz. Olduğumuz menünün haricinde bir menüye tıklarsa geçiş için kullanacağız.
override fun onNavigationItemSelected(item: MenuItem): Boolean { navigationMenu.menu.findItem(item.itemId).isChecked = true //Menüde seçilen itemi belirtiyoruz when(item.itemId){ R.id.home -> { setTitle(getString(R.string.home)) replaceFragment(HomeFragment()) } R.id.search -> { setTitle(getString(R.string.search)) replaceFragment(SearchFragment()) } R.id.share -> { setTitle(getString(R.string.share)) replaceFragment(ShareFragment()) } R.id.notifications -> { setTitle(getString(R.string.notifications)) replaceFragment(NotificationFragment()) } R.id.profile -> { setTitle(getString(R.string.profile)) replaceFragment(ProfileFragment()) } } return false } - Başlığı değiştirmek için setTitle adında bir fonksiyon yazıyoruz.
private fun setTitle(title: String){ //Seçilen itemin başlığını yazdırıyoruz val actionBar: ActionBar? = supportActionBar actionBar?.title = title } - Ve son olarak Fragmentleri replace ederek FrameLayoutta göstermek için fonksiyon ekliyoruz.
private fun replaceFragment(fragment: Fragment){ //Fragmenti ekliyoruz
    val transaction: FragmentTransaction = supportFragmentManager.beginTransaction()
    transaction.replace(R.id.container, fragment)
    transaction.commit()
}
Şimdi test edebiliriz.
Bu yazıda android BottomNavigationView kullanımı konusuna yer verdik. Proje kodlarına buradan ulaşabilirsiniz. Soru, görüş ve önerileriniz için lütfen yorum yapmayı unutmayın.